Nextcloud AIO install on Proxmox
This guide walks you through setting up a robust Nextcloud All-in-One (AIO) instance using a Debian LXC container. We focus on a high-performance configuration optimized for speed and reliability.
High-Performance Deployment via Proxmox & Nginx Proxy Manager
This guide walks you through setting up a robust Nextcloud All-in-One (AIO) instance using a Debian LXC container. We focus on a high-performance configuration optimized for speed and reliability.
A video of this setup is also available here:
https://tube.ramforth.net/w/v8xVSB9KsSNz2T81n5xLeB
Phase 1: Creating the Debian LXC
For convenience and speed, we utilize Proxmox Helper Scripts to generate our base container.
bash -c "$(curl -fsSL https://raw.githubusercontent.com/community-scripts/ProxmoxVE/main/ct/debian.sh)"You run this in the PVE node shell as root or elevated user, depending on your setup.
Advanced Setup Configuration
During the script execution, select Advanced Install and apply the following parameters:
- Resources:
- CPU Cores: 8
- RAM: 16384 MiB (16GB) — Selected for maximum installation speed.
- Disk Size: 32GB (ext4)
- Networking:
- Bridge:
vmbr0 - IPv4: DHCP (Static reservation handled in router later)
- IPv6: Auto
- Bridge:
- Container Features (Crucial):
- Unprivileged: Yes (Recommended for security)
- Nesting: Yes
- FUSE Support: Yes
- Keyctl Support: Yes
- Root SSH Access: Yes
- Environment:
- Timezone: Europe/Oslo (or your local preference)
- Container Protection: Yes (Recommended for production)
Phase 2: System Provisioning
Once the container is live, SSH into it as root using your preferred terminal and run the following commands to set up your environment.
1. Create your User
Bash
adduser <your_username>
usermod -aG sudo <your_username>
2. Install Docker
Bash
curl -fsSL https://get.docker.com | sudo bash
usermod -aG docker <your_username>
3. Network & DNS Setup
- Static IP: In your router/firewall, set a static DHCP lease for this container.
- DNS: Point
yourcloud.yourdomain.tldto the IP address of your Nginx Proxy Manager (NPM) instance.
Phase 3: Reverse Proxy Configuration (NPM)
To ensure Nextcloud handles traffic correctly through your proxy, configure a new Proxy Host in NPM with these specific settings:
Details & SSL
- Domain Name:
yourcloud.yourdomain.tld - Scheme:
http| Forward IP:192.168.X.X| Forward Port:11000 - Websockets Support: ON
- SSL: Request new certificate, Force HTTPS ON, HTTP/3-Quic ON.
Advanced Configuration
Paste the following into the Advanced tab to ensure proper communication between the proxy and the AIO containers:
Nginx
location ^~ /browser {
    proxy_pass http://127.0.0.1:11000;
    proxy_set_header Host $host;
}

location ^~ /cool {
    proxy_pass http://127.0.0.1:11000;
    proxy_set_header Upgrade $http_upgrade;
    proxy_set_header Connection "Upgrade";
    proxy_set_header Host $host;
    proxy_read_timeout 36000s;
}
Phase 4: Deploying Nextcloud AIO
Run the following command in your LXC terminal to pull and start the Master Container:
Bash
docker run \
--sig-proxy=false \
--name nextcloud-aio-mastercontainer \
--restart always \
--publish 8080:8080 \
-e APACHE_PORT=11000 \
-e APACHE_IP_BINDING=0.0.0.0 \
-e SKIP_DOMAIN_VALIDATION=true \
-v nextcloud_aio_mastercontainer:/mnt/docker-aio-config \
-v /var/run/docker.sock:/var/run/docker.sock:ro \
nextcloud/all-in-one:latest
Phase 5: Initial Setup & Launch
- Access the Admin Panel: Navigate to
https://<your-internal-IP>:8080. - Passphrase: Copy the setup passphrase immediately and store it in a password manager.
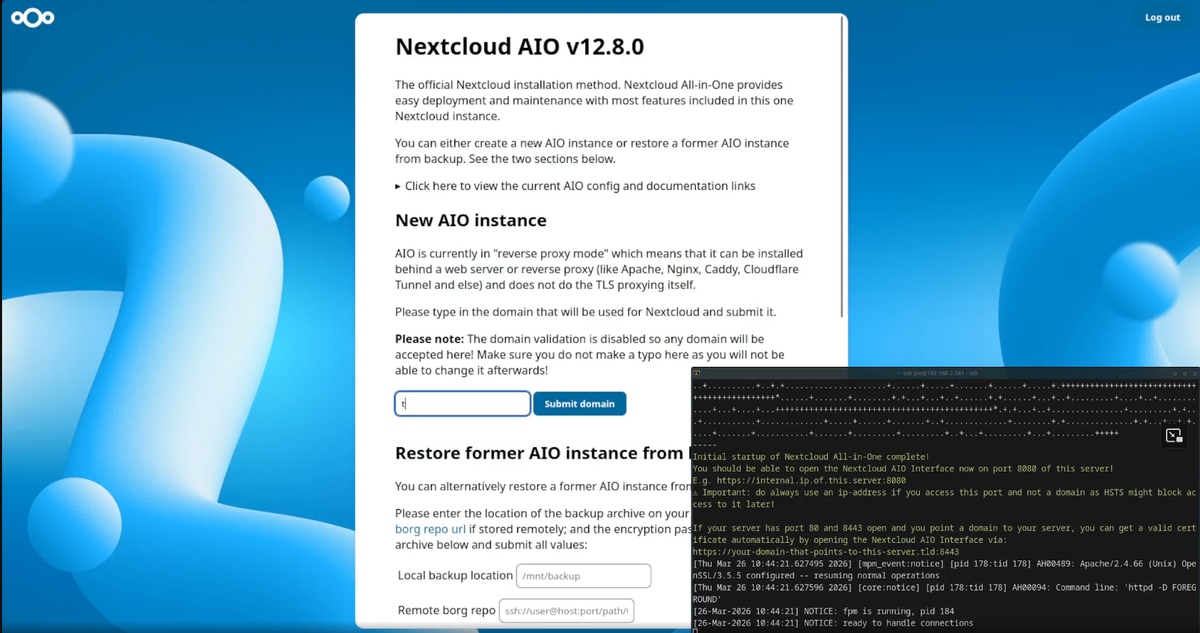
- Domain Submission: Enter
yourcloud.yourdomain.tldand select your desired Nextcloud features. - Admin Credentials: Once finished, the UI will display a generated admin password. Save this securely!
Containers Start: Click "Start Containers."
Note: Your browser might timeout during this process. If a "resubmit data" popup appears, click Cancel and simply refresh the page manually once the containers are up.
Phase 6: Post-Install Optimization
It is common to see a few "Warnings" in the Administration settings immediately after install. Here is how to fix them:
Fix Missing Indices
Run this command within your LXC to optimize the database:
Bash
sudo docker exec --user www-data nextcloud-aio-nextcloud php occ db:add-missing-indices
Fix "Cron has not been run"
Manually trigger the first cron job and ensure Background Jobs is set to Cron in the Nextcloud Admin settings:
Bash
sudo docker exec --user www-data nextcloud-aio-nextcloud php /var/www/nextcloud/cron.php
Your Nextcloud AIO instance is now ready! Would you like me to help you draft a "Maintenance & Backup" section for this article to cover automated snapshots?
- Log in to Nextcloud
- Make a Debian container using HelperScripts for convenience
- Advanced Install
- Unprivileged (recommended)
- Set container ID
- Set Hostname
- Set Disk Size
- Set CPU cores
- Set RAM (I chose 16384Mib = 16GB for speed during installation)
- Select network bridge: vmbr0 (default)
- Select IPv4 Address Assignment: DHCP
- Select IPv6 Address Management: auto
- MTU SIZE: leave blank
- DNS SEARCH DOMAIN: leave blank
- DNS SERVER: leave blank
- MAC ADDRESS: leave blank
- VLAN TAG: leave blank
- CONTAINER TAGS: user choice (I went with default, can be changed in Proxmox GUI)
- SSH KEY SOURCE: none No keys
- Enable root SSH access: yes
- FUSE SUPPORT: yes
- TUN/TAP SUPPORT: no
- NESTING SUPPORT: yes
- GPU PASSTHROUGH: no
- KEYCTL SUPPORT: yes
- APT CACHER PROXY: no
- CONTAINER TIMEZONE: User preference (I chose Europe/Oslo=
- CONTAINER PROTECTION: YES (for production servers)
- DEVICE NODE CREATION: yes
- MOUNT FILESYSTEMS: ext4
- VERBOSE MODE: no
- CONFIRM SETTINGS
- Save advanced settings as defaults for Debian? no
Debian LXC Specs from video
Disk size: 32GB
CPU Cores: 8
RAM in MiB: 16384
SSH into new container
Use your preferred terminal to log into the server as root.
Commands from the video:
- adduser <your_username> (and set password)
- Download docker:
curl -fsSL https://get.docker.com | sudo bash
Set user privileges:
usermod -aG sudo <username>
usermod -aG docker <username>
Set your DHCP, Proxy and DNS
In router/firewall - set container to static IP.
Set your DNS to point yourcloud.yourdomain.tld to your reverse proxy IP (NPM)
Set your NPM settings
Details tab:
Domain name: yourcloud.yourdomain.tld
Scheme: http 192.168.X.X 11000
Websockets support: ON
Custom Locations tab:
nothing
TSL tab:
Request new SSL certificate
Force HTTPS: on
Enable Brotli: off
Enable HSTS and security headers: off
Enable HTTP/3-Quic: on
Advanced tab:
location ^~ /browser {
proxy_pass http://
proxy_set_header Host $host;
}
location ^~ /cool {
proxy_pass http://
proxy_set_header Upgrade $http_upgrade;
proxy_set_header Connection "Upgrade";
proxy_set_header Host $host;
proxy_read_timeout 36000s;
}
Save the Proxy host
Install the Nextcloud AIO with the following command:
docker run
--sig-proxy=false
--name nextcloud-aio-mastercontainer
--restart always
--publish 8080:8080
-e APACHE_PORT=11000
-e APACHE_IP_BINDING=0.0.0.0
-e SKIP_DOMAIN_VALIDATION=true
-v nextcloud_aio_mastercontainer:/mnt/docker-aio-config
-v /var/run/docker.sock:/var/run/docker.sock:ro
nextcloud/all-in-one:latest
Open the AIO admin panel at https://<yourIP>:8080
Copy the passphrase in the initial window, then save it somewhere secure, then paste it into the next window to authenticate.
Submit your domain name that we set up in NPM in the Nextcloud AIO container manager window and select the functions you want to enable at start.
Start the containers.
During this startup, browsers will likely timeout. Press "cancel" on the popup that requests data to be sent again. You can reload the page afterwards.
When all the containers are running, you will be presented with a generated admin password. Copy and save securely before proceeding.
By this point you should be able to log in to your cloud.domain.tld using your "admin" and the generated password.
Most times there will be at least a couple of errors straight off the bat.
One is the database missing indices.
This can be resolved by issuing the command: sudo docker exec --user www-data nextcloud-aio-nextcloud php occ db:add-missing-indices on the LXC.
The other usual error is "Cron has not been run". This can be resolved by issuing the command: sudo docker exec --user www-data nextcloud-aio-nextcloud php /var/www/nextcloud/cron.php and then making sure the Administrator settings have Background Jobs set to Cron.